App Gatekeeper Help Guide
Posted by sky
If you do not know what App Gatekeeper does, please read the App Gatekeeper introduction first.
App Gatekeeper: main screen
Here, you will setup the apps or/and the categories maximum usage limits and their specific access times.
Using categories make it easier to setup, since you likely only need to setup a few categories maximum usage limits and access times. Gatekeeper comes with a set of default categories already pre-created that you can use immediately. You can also delete these categories and create your own categories with the exception of the category named "Default". The category "Default" is a catch-all category for any apps that you did not assign a category.
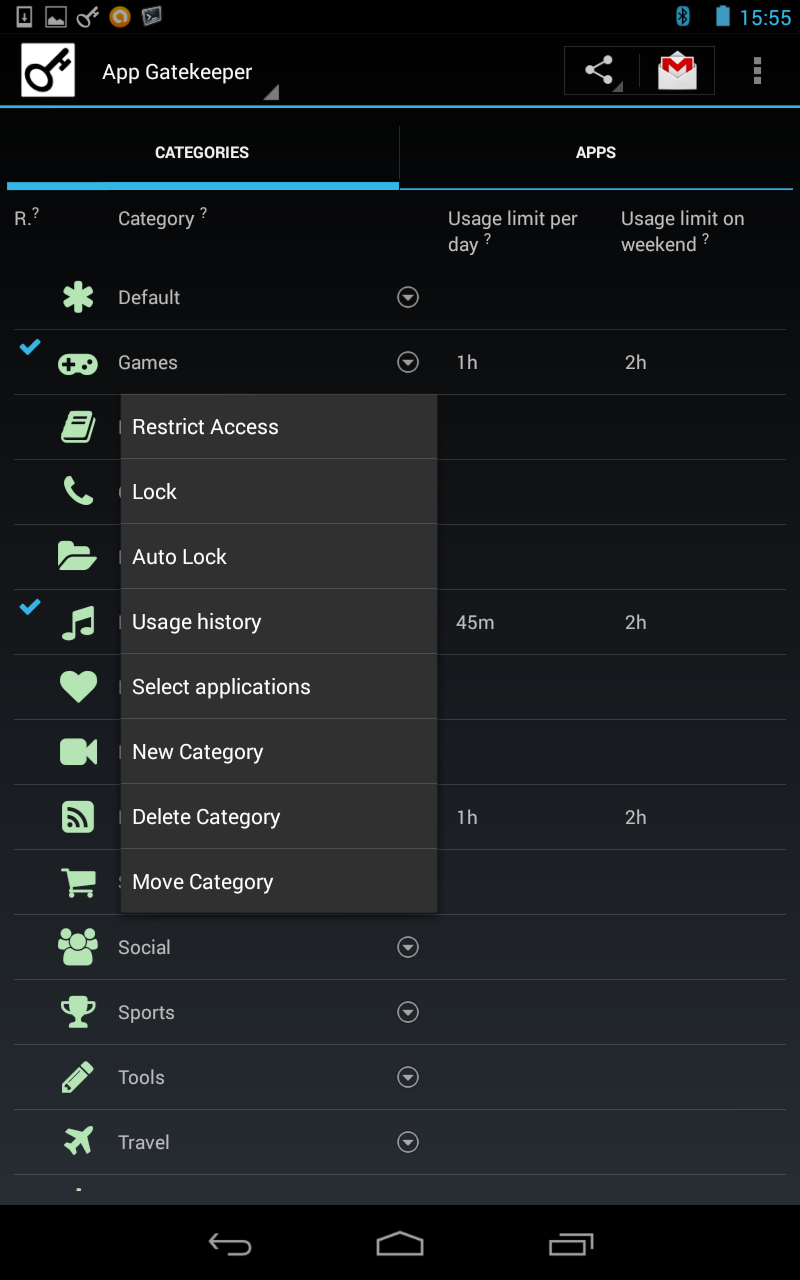
The categories tab lists all your categories. Tapping on a category name shows its context menu which consists of:
- Restrict Access - to specify the category access times
- Lock - to manual lock the category values (only in premium)
- Auto Lock - to auto lock the category values (only in premium)
- Usage history - go to the Usage history screen for the category
- Select applications - to setup/assign/unassign apps to the category
- New Category - to create a new category
- Delete Category - to delete the category
- Move Category - to move/re-order the category
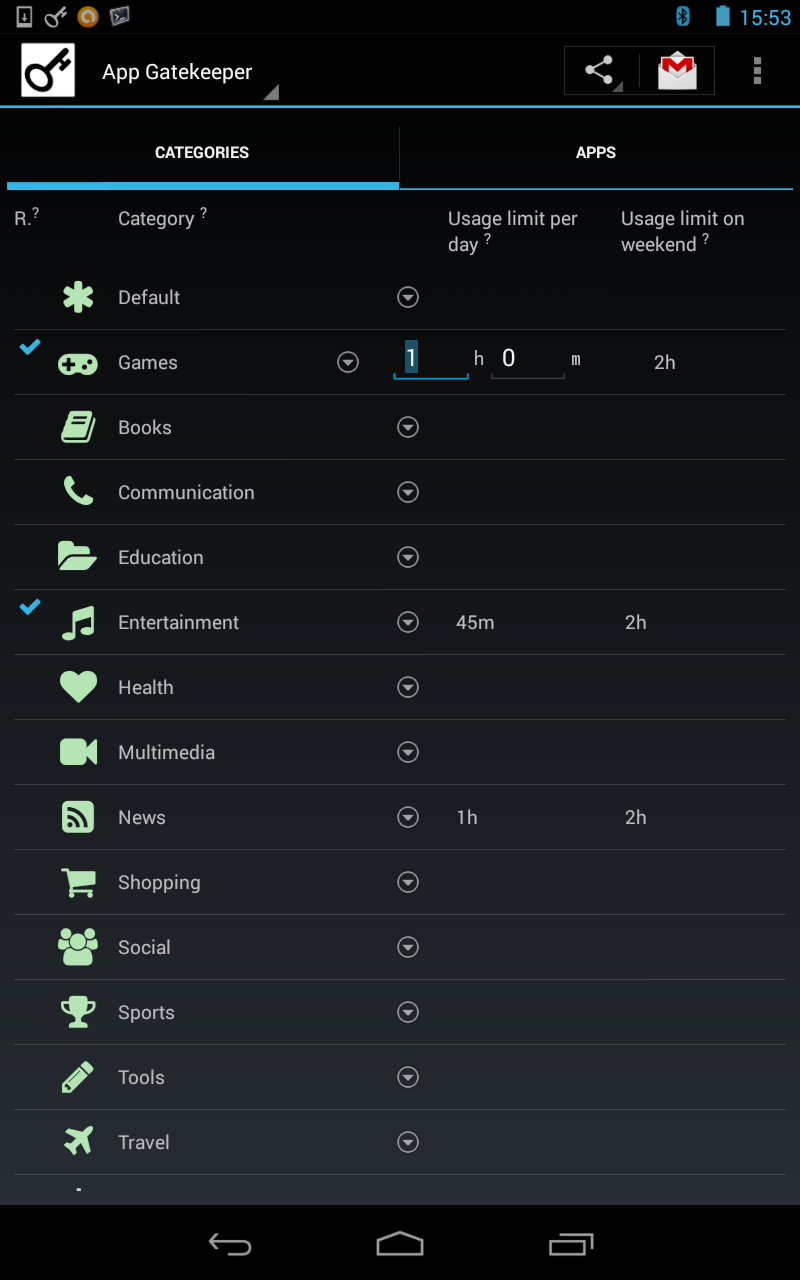
Tapping on the "Usage limit per day" or "Usage limit on weekend" column of a category row allows you to edit the maximum usage limit of the category. You enter the usage limit in hours (h) and minutes (m). The entered usage limit is immediately saved once the editing widget is closed. (goes away). For example, you can tap on another category name to close the editing widget, or you can tap on another category usage limit to edit them (it will save your previous edit first).
Entering a 0 or blank limit is the same as specifying there is no limit. The usage limit per day applies to every day from Monday to Sunday. The usage limit on weekend only applies on Saturday and Sunday if you have entered a non-0 limit, it will override the usage limit per day.
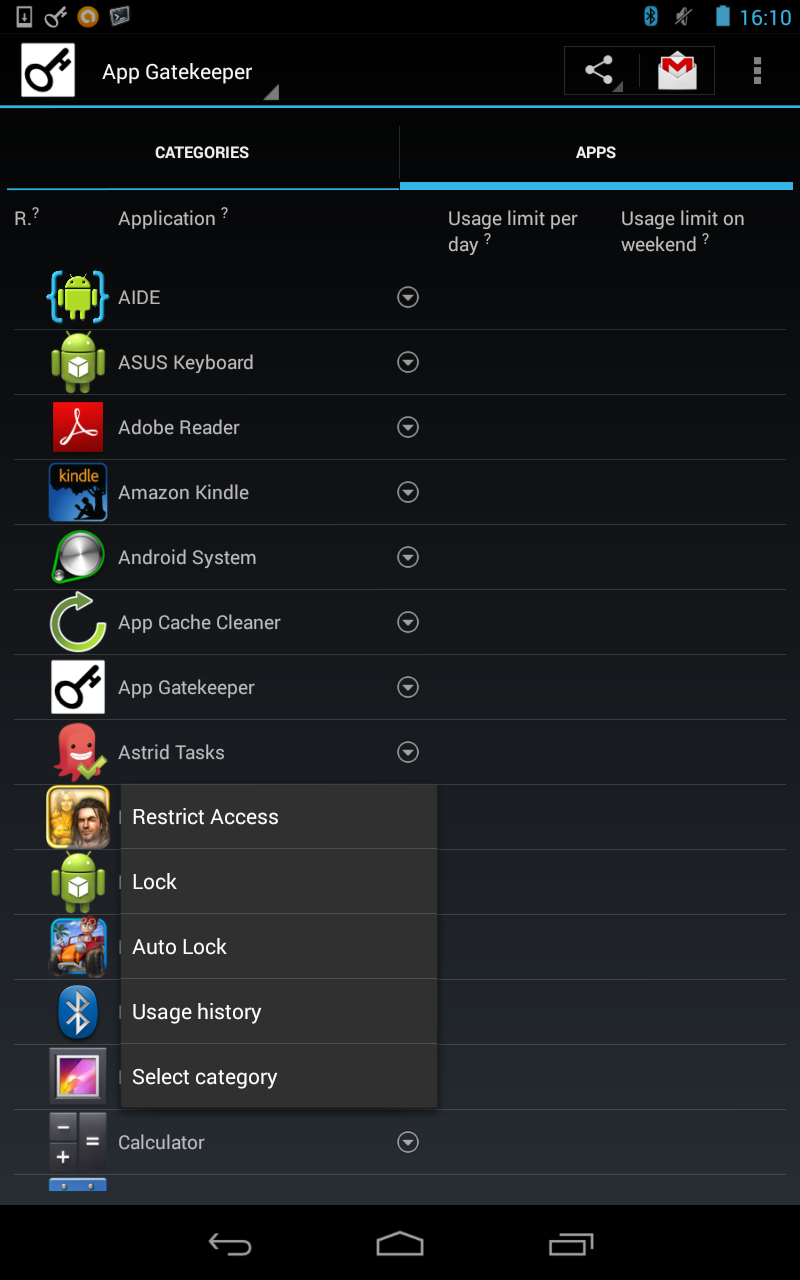
The apps tab lists all your apps on your device. By default, it lists only non-system apps (apps that you have installed yourself). You can make it lists all your apps via the setting "Include system apps". Apps have the same features as categories, other than you cannot create/delete/move them.
Tapping on an app name shows its context menu which consists of:
- Restrict Access - to specify the app access times
- Lock - to manual lock the app values (only in premium)
- Auto Lock - to auto lock the app values (only in premium)
- Usage history - go to the Usage history screen for the app
- Select category - to assign the app to a category
Tapping on the "Usage limit per day" or "Usage limit on weekend" column of an app row allows you to edit the maximum usage limit of the app. This is similar to how it works in the categories tab.
The actionbar overflow menu consists of:
- Backup - to backup all the entered values (only in premium)
- Restore - to restore the values from a backup file (only in premium)
- Sort by name - to order the apps or categories by their names
- Sort by restriction - to order the apps or categories with either a usage limit or/and access times first, and then order by their names
There is a standard "Share" icon on the actionbar, you can share a message to your friends about the benefits of using App Gatekeeper. If you like this app or find it beneficial, please share it with your friends.
Allowed Access
From the main screen (App Gatekeeper), you can tap on the "Restrict Access" context menu item to come to the "Allowed Access" screen. (or "Restricted Access")
Here, you will setup the app (or category) allowed access times (by default). If you wish, you can setup restricted access times instead via the setting "Set allowed access times".
There are these 6 buttons at the top:
- Add - to add a time period (start time and end time)
- Update - to update a time period
- Delete - to delete a time period
- Delete all - to delete all time periods
- Inherit - to copy the time periods from the app's category. (this is displayed only if there is no time periods, and the app's category has at least 1 time period)
- Set days - to assign the days (Mon to Sun) in which the time period applies
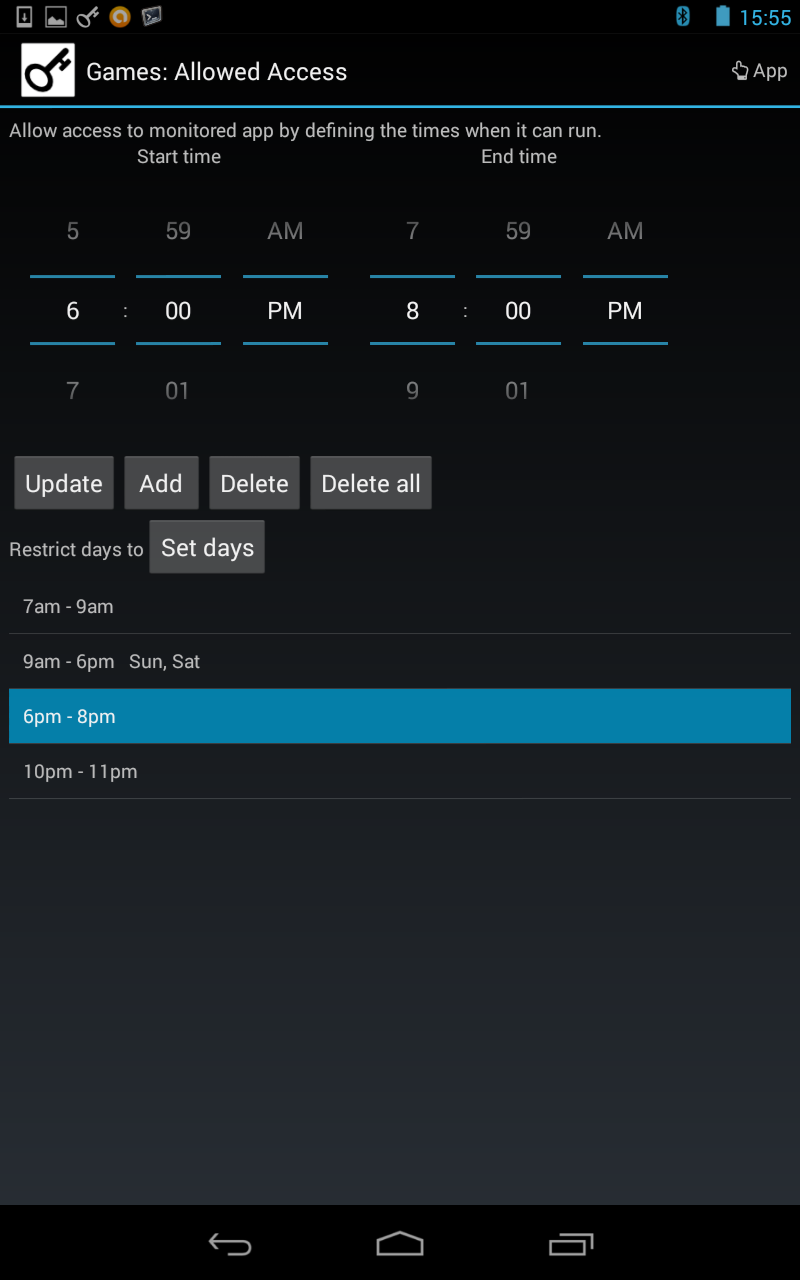
The earliest start time is at midnite 12am, and the latest end time is at 11:59pm (more correctly, it is also at midnite 12am). Similar to the usage limit, if no access times are entered, then you can access the app at any time without restriction. (or all the apps under the category if this is a category access)
The list of time periods are automatically sorted/ordered by their times (first by the start time, then by the end time). By default, a time period has no assigned days, this means it applies to all the days from Monday to Sunday. If you would like to setup a period applicable on only Monday, you can click on "Set days" button to select only Monday for the period. The "Restrict days to" dialog provides a shortcut in its navigation dropdown to select all weekdays, weekend, and all days (no assigned days).
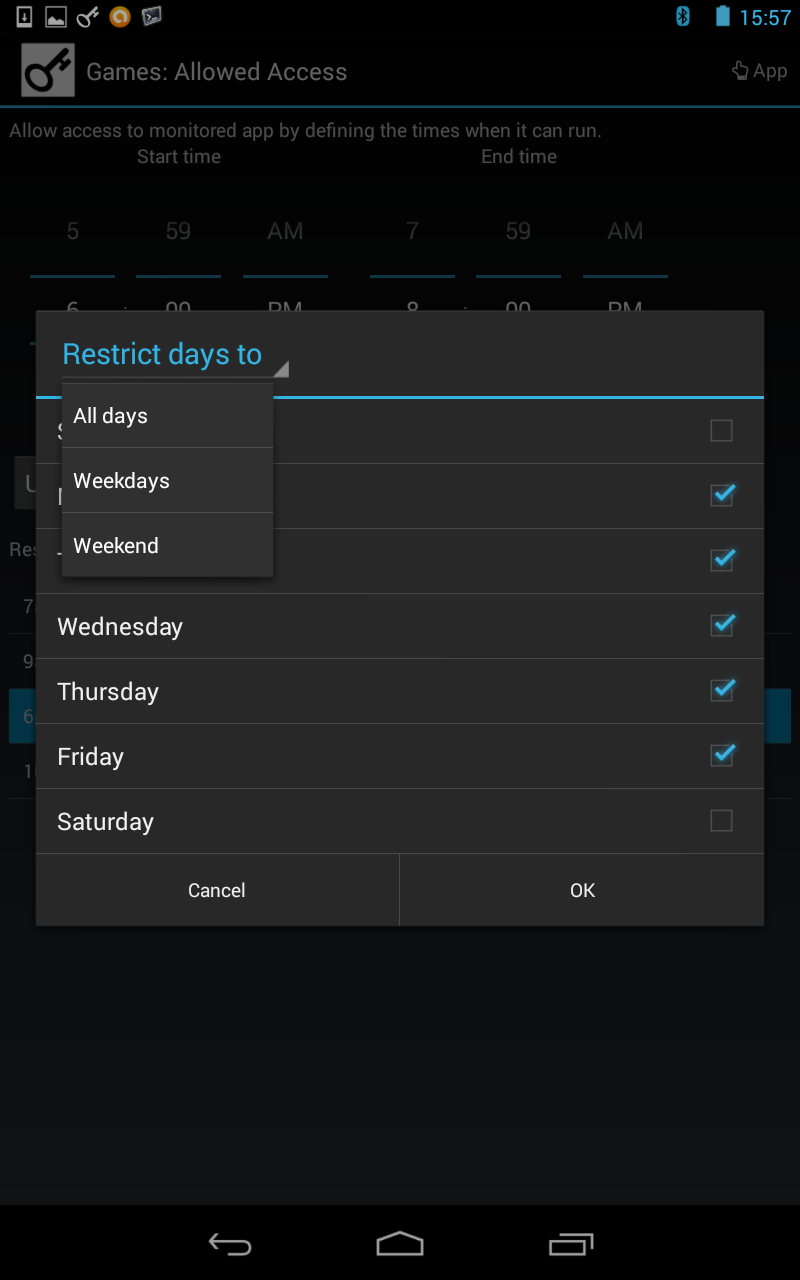
The "Select App" icon on the actionbar allows you to select and edit the access times of an app (or category) that has access times without first going back to the main screen.
The edited time periods are saved only when you go back to the main screen (either using the device back button or tap on the App Gatekeeper icon) or when you use the "Select App" icon to edit another app (or category) access times. When you have gone back to the main screen, a check mark is shown beside the app (or category) icon if you have defined at least 1 time period. Tapping on the check mark or the app/category icon will popup a tooltip showing the allowed access times.
There is also a way to cancel the modification by rotating the device to change its orientation. In this case, the time periods are loaded from its last saved state.
If you uncheck the setting "Set allowed access times" (in the Settings screen), the time periods you setup here subsequently will be restricted time periods instead. This means that if you have a time period from 9pm to 11pm on Sat and Sun, then you are prevented from accessing the app from 9pm to 11pm on Sat and Sun.
When the setting "Set allowed access times" changes, the time periods will be automatically converted from either allowed time periods to restricted time periods, or restricted time periods to allowed time periods without changing its original definition/meaning.
Special Note
There is a slight difference between how Gatekeeper prevents user from accessing via checking the maximum usage limit and via checking the specific access times.
For the maximum usage limit check, it will check against both the app's maximum usage limit and the app's category maximum usage limit, and only when both limits are not reached, then the user can still access the app.
For the access times check, it will first check against the app's defined access times if there exist at least one time period. The user can access the app if the defined access times allows it, or cannot access the app if it is disallowed. Only if the app has no defined access times, then Gatekeeper will next check against the app's category defined access times to either grant or deny access. If the category also has no defined access times, then this app can always be accessed at any time.
From the main screen, you can access the other screens via the navigation dropdown in the actionbar. The navigation dropdown consists of:
- App Gatekeeper - go back to main screen (or tap on the App Gatekeeper icon)
- App Usage - go to App Usage screen
- Settings - go to Settings screen
- Help - go to Help screen
- Upgrade - to upgrade to premium version
The Upgrade option will not be shown once you have upgraded.
App Usage screen
Here, you can track your daily apps usage, and individual app/category usage history.
The usage screen shows today usage of apps by default. The apps are ordered by descending usage. There are 3 options at the top: Apps, Categories and All. The Apps option displays only the apps usage. The Categories option displays by the categories first, with the apps group under their category. The All option displays all the apps and categories together by descending usage.
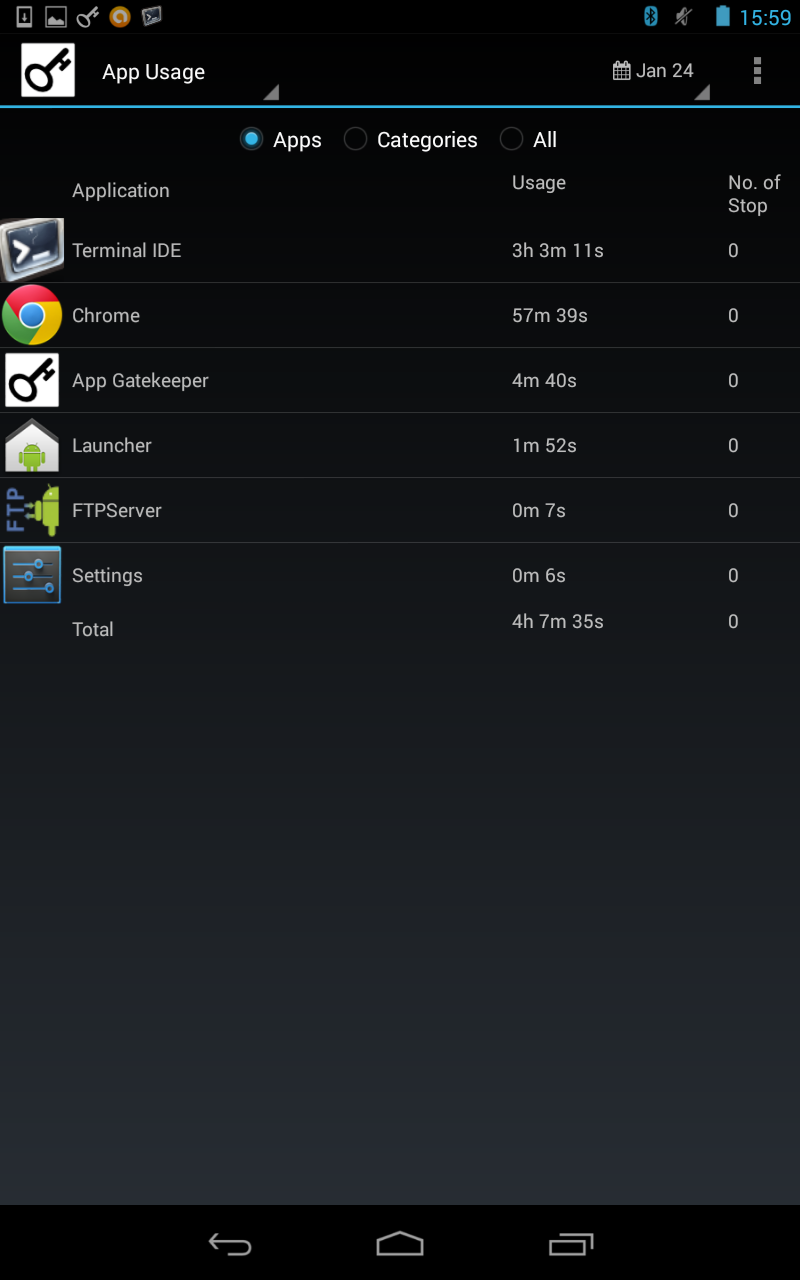
The category usage is recorded when an app usage is recorded and the app was assigned to the category. Thus, the category usage is not a computed usage at the time of report, but a usage that is tracked independently when the user is using an app. So, if later you assign the app to another category, this will not change the original category usage.
However, the categories option simply group the apps by their current assigned category. This means in general, we cannot know the exact breakdown of the category usage in the past if the apps are re-assigned to other categories.
Beside tracking app usage, App Gatekeeper records "No. of Stop", this is the number of times in a day the app is being prevented from access due to exceeding the maximum usage limit of the app.
On the actionbar, there is a calendar icon for selecting another date to show usage on that date.
The actionbar overflow menu consists of:
1. Export All Usage - to export all the recorded usage data (only in premium)
Tapping on an app (or category) row will show the app (or category) usage history.
On usage history screen, all the past app usage data are listed by descending date. The app usage data for the current day is not reflecting the latest usage, the current day latest usage can only be checked on the daily App usage screen.
The amount of past data to keep can be set via the setting "Days of usage data to keep".
The Graph tab will show the app usage data on a line graph where the x-axis shows the dates and the y-axis shows the usage in hh:mm format. (eg. 2:40 is 2 hours and 40 mins) If the app maximum usage limit is defined, then a horizontal line representing the limit is also drawn.
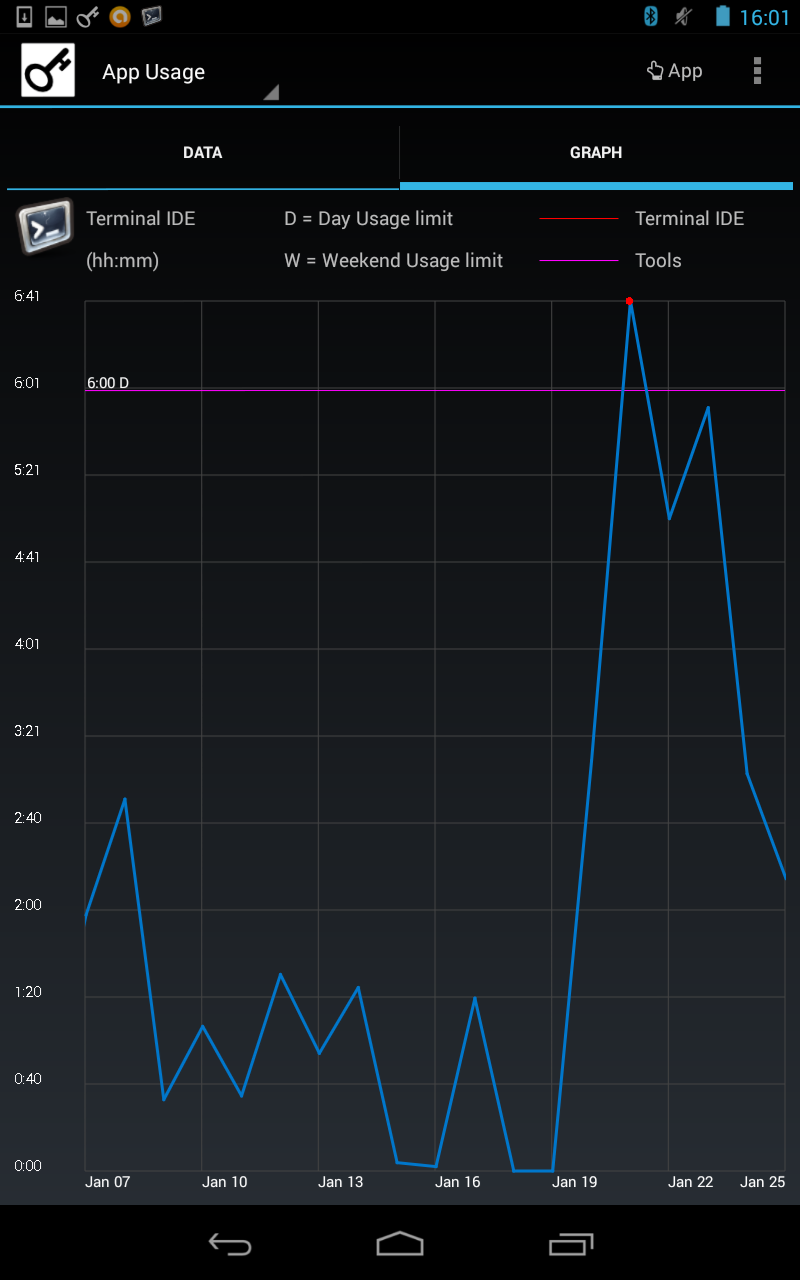
On the actionbar, there is a "Select App" icon for selecting another app/category to show their usage history. The actionbar overflow menu consists of:
- Export Usage - to export the recorded usage data of the current app/category (only in premium)
- Export All Usage - to export all the recorded usage data (only in premium)
The usage data is exported to a CSV file in the directory specified in the setting "Export to directory path". The filename is named with the app's package name for Android apps, and named with the category name for categories. (All usage is exported to allappsuse.csv)
From the usage history screen, using the device back button will go back to the daily App usage screen. Selecting "Usage history" context menu item on the main screen will show the usage history screen directly. (bypassing the daily usage screen)
Settings screen
Here, you can change the various available settings. They are in order:
- Include system apps - Default is unchecked. (The main screen lists only non-system apps by default)
- Set allowed access times - Default is checked. ("Allowed Access" screen defines allowed access times by default)
- Show context menu - Default is normal press. (In the main screen, a normal tap on the app name will show the app context menu by default)
- Usage left before warning - Default is 0 min. (The warning message does not appear by default)
- Application Crash Report - Default is unchecked. (The crash report is not sent by default)
- Category icon color - (The color used by all the categories icons)
- Tooltip background color - (The background color used in all the tooltips)
- The password for lock - (only in premium. This password is required for locking and unlocking)
- Days of auto lock - Default is 7. (only in premium. The default auto-lock period is 7 days. After the auto-lock period passes, an auto-lock will expire)
- Days of usage data to keep - Default is 30. (only in premium. The default number of days of past usage data to keep is 30 days)
- Export to directory path - Default is /sdcard/appgatekeeper (only in premium. The default path is automatically created on first use if the user has not changed the path)
- About App Gatekeeper - show the version information.
When you enter the Settings screen for the first time, you will be prompted to set the "Show context menu" setting. After upgrade, you will be prompted to set the lock password if you have not entered a password yet.
The main difference between the 2 options for "Show context menu" is that for "Long press", when you tap on the app/category name, it will show the "Allowed Access" screen directly and the "Restrict Access" menu item does not appear in the context menu activated by the long press.
The "Usage left before warning" setting is useful in giving you early notice that App Gatekeeper is about to prevent you from accessing/using the current app. You will have some time left to save your work or to save your game state. For example, if you set this to 3 mins, and you have setup a maximum usage limit of 1 hr for the Games category. When you are playing a game app (have assigned the app to Games category), and you have already spent 57 mins on games, Gatekeeper will start showing a message notification (at bottom of screen) indicating the remaining amount of usage left once it is below 3 mins. Once you have used up all the allowed maximum usage, a message notification will indicate the game app is stopped. The stopped notification will always be shown if an app is being stopped independent of this setting.

 App Gatekeeper